
Compost tumbler not heating up? There is a special kind of frustration in opening your compost tumbler after three weeks and finding the same cold, unchanged scraps you put in. No steam. No warmth when you plunge your hand in. Just a drum of soggy leaves that seems to be doing absolutely nothing. The forums are full of this exact complaint, usually phrased the same way: “my tumbler is full but nothing is happening.”
Here is what is really going on. Heat in a compost tumbler is not produced by the tumbler. It is produced by microbes, and microbes are picky. They need the right fuel mix, enough moisture, enough oxygen, and enough critical mass to get going. A tumbler that stays cold is a tumbler where one or more of those conditions is missing. The machine is innocent. The recipe is guilty.
This guide covers the seven reasons a tumbler stays cold, each with its specific fix. They are ordered from most common to least common, so start at the top and work down. By the end, your drum should be heating up or you will know exactly which structural problem to solve.
Nothing here comes from hands-on product testing. Every claim is grounded in manufacturer spec sheets, published reviewer findings, and owner reports from gardening communities.
- A tumbler stays cold when the microbe recipe is wrong: too many browns, too little moisture, too little mass, or no turning.
- Heat comes from nitrogen-rich greens being consumed by microbes. A drum full of dry leaves has almost no fuel.
- The critical mass for a hot drum is roughly three-quarters full. A half-empty tumbler cannot insulate its own heat.
- A compost thermometer removes all guesswork: below 90 degrees F means the microbes never started; 130 to 160 F is the active sweet spot.
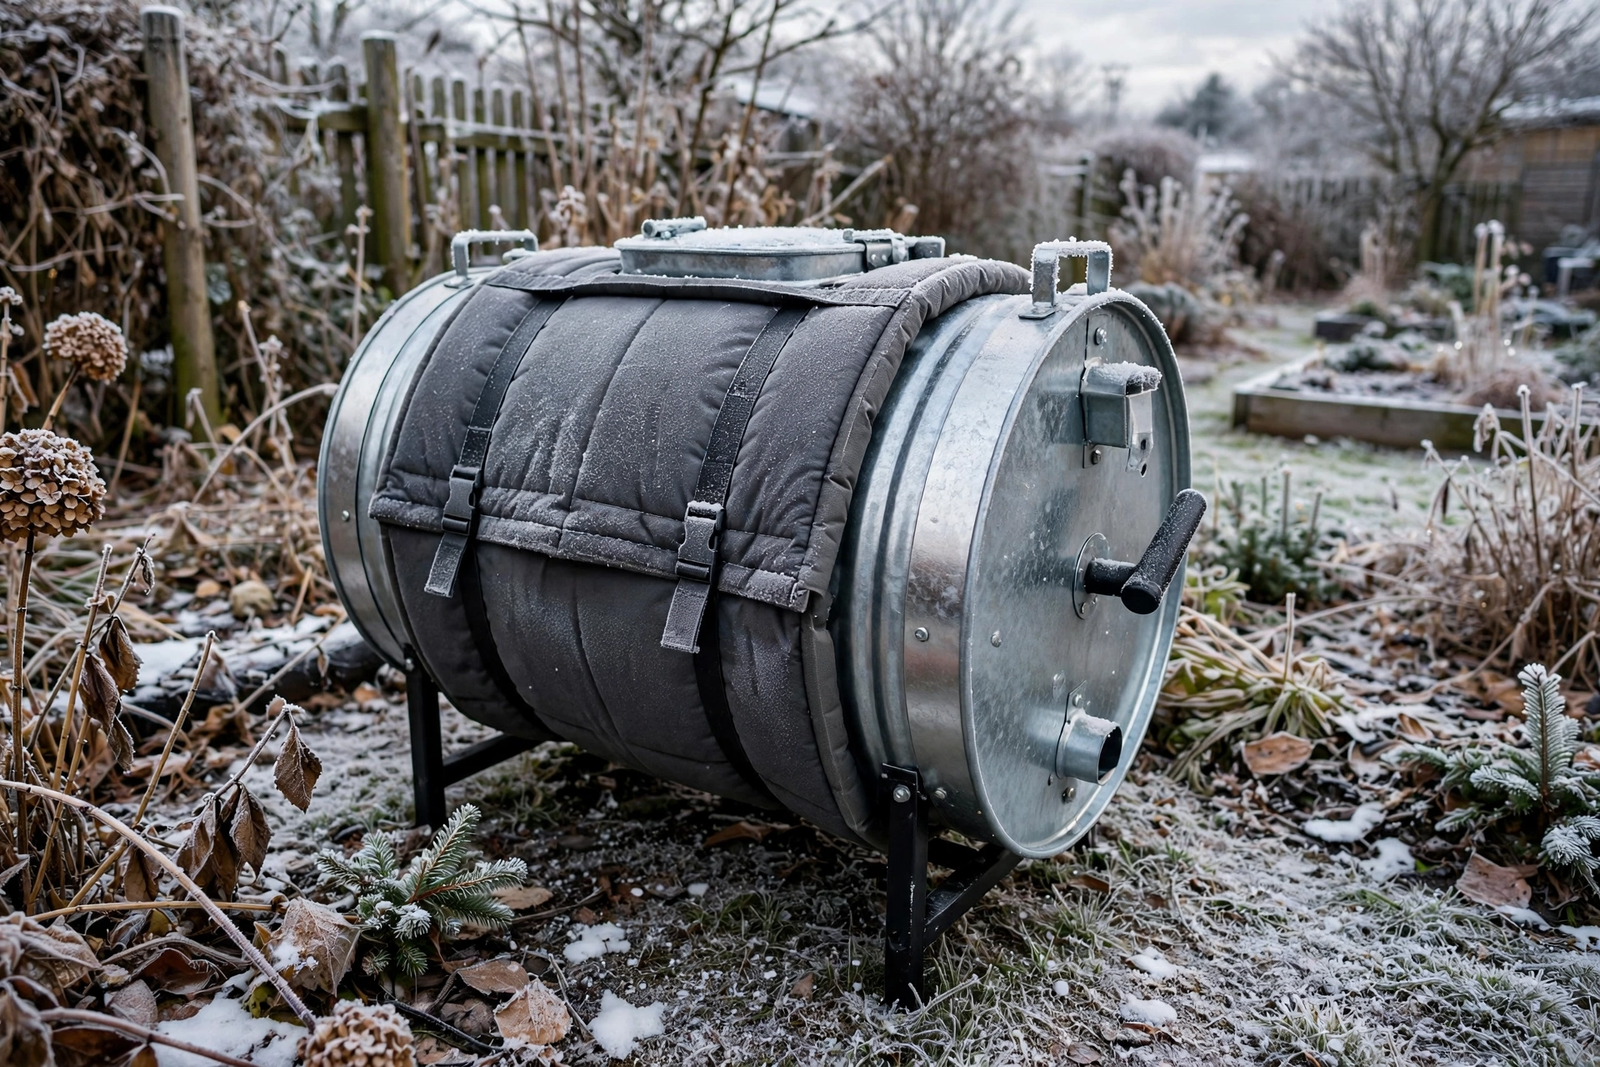
- Insulated tumblers like the Jora JK270 hold heat that plastic drums lose, which is why they are the standard answer for cold-climate composting.
Reason 1: Compost Tumbler Not Heating Up (Too Many Browns, Not Enough Greens)
This is the number one cause of cold tumblers, and it is the mirror image of the smell problem. Dry leaves, cardboard, and straw are carbon-rich browns. Microbes need nitrogen-rich greens (kitchen scraps, fresh grass clippings, coffee grounds) as fuel to generate heat. A drum stuffed with fall leaves and nothing else is like a fireplace full of logs with no kindling.
The fix: add fresh greens at roughly one part greens to three parts browns by volume, tumble to mix, and check the temperature in 48 hours. If you are short on kitchen scraps, fresh grass clippings are the fastest nitrogen source available, and a scoop of nitrogen fertilizer or a commercial compost activator like Jobe’s Organics Compost Starter can jump-start a stalled drum.
Reason 2: The Drum Is Too Dry
Microbes need water to work. A tumbler full of dry shredded paper and dead leaves will sit there indefinitely doing nothing. The squeeze test applies here too: grab a handful and squeeze. If it is dusty and no moisture shows, the drum is too dry. Add water a little at a time, tumbling between additions, until the material feels like a wrung-out sponge.
Reason 3: Not Enough Mass
Heat is insulation as much as it is fuel. A tumbler that is only a quarter full cannot hold heat because there is not enough material to trap it. The drum needs to be roughly two-thirds to three-quarters full before the core can sustain thermophilic temperatures. If your drum is mostly empty, keep feeding it until it reaches that level, and be patient in the meantime.
Reason 4: You Are Not Tumbling Enough
Tumbling does two things for heat: it mixes fresh oxygen in, and it redistributes moisture and microbes through the material. A drum that sits untouched for two weeks develops cold, compacted zones. The fix is the standard rhythm: 5 to 6 rotations every two to three days. Do not tumble constantly, since that vents heat out of the drum.
Reason 5: The Drum Is Too Small for Your Climate
Small plastic drums lose heat through their walls fast, especially in cool weather. This is physics, not user error. If your drum heats fine in July but goes stone cold in October, the walls are bleeding heat faster than the microbes can make it. The structural fix is insulation. The Jora JK270 is the enthusiast standard here: its insulated steel walls hold internal temperatures that plastic drums cannot, with owners reporting sustained heat through seasons when uninsulated drums stall. If you are choosing a compact drum in the first place, our guide to the best compost tumblers for small spaces picks the small models that still hold heat and finish compost.
Reason 6: Particle Size Is Too Large
Whole leaves, big cardboard sheets, and long branches mat down or leave air gaps that microbes cannot bridge. Shred everything before it goes in: run a mower over leaves, tear cardboard into strips, chop woody stems small. Smaller particles mean more surface area, and more surface area means faster microbial action and faster heat.
Reason 7: It Is Winter
Below about 40 degrees F ambient, most uninsulated tumblers stall no matter what you do. The microbes simply slow to a crawl. This is normal and not a failure. Your options are to keep feeding the drum so it is ready to fire up in spring, switch to an insulated model like the Jora for genuine winter composting, or accept a cold-season pause and store scraps in a bin or leaf cage until temperatures rise.
How to Know It Is Working: Use a Thermometer
A compost thermometer is the single best diagnostic tool in this hobby. The widely recommended REOTEMP models come in stem lengths that reach the core of the drum, with dials marked into zones so you can read the microbe activity at a glance. Below 90 F, the pile never started. From 100 to 130 F, it is active. From 130 to 160 F, it is in the thermophilic sweet spot where weed seeds and pathogens die. Above 160 F, turn the drum to cool it before beneficial microbes start dying off. Without a thermometer, you are guessing. With one, you know.
Top Picks at a Glance
Jora JK270
Insulated steel walls hold the heat that plastic drums lose. The cold-climate standard.
FCMP Outdoor IM4000
Deep fins and good vent placement fix stalls caused by compaction.
VIVOSUN 43-Gallon Dual Chamber
Big capacity and adjustable vents for a budget fresh start.
Detailed Reviews
1 Jora JK270
The JK270 exists for exactly this problem. Where plastic drums bleed heat through thin walls, the Jora’s insulated galvanized steel body holds it. Owner reports describe sustained internal heat through shoulder seasons when uninsulated drums stall, with temperatures climbing into the range that kills weed seeds. The dual-chamber design keeps one side cooking while you fill the other, and the compact footprint fits small gardens. It processes up to about 2.5 kg of waste per day once running.
The honest caveats: it is a premium-tier purchase, assembly needs two people, and the insulation is the feature you are paying for, so if your climate is warm year-round a plastic drum heats fine for far less money.
Who it’s for: anyone whose drum stalls every fall, or who wants genuine winter composting. Who should skip: warm-climate gardeners on a budget.
| Capacity | 9.5 cubic feet (about 70 gallons), dual chamber |
| Construction | Insulated galvanized powder-coated steel |
| Processing rate | Up to about 2.5 kg of waste per day |
| Heat performance | Owner-reported temperatures well above 140 F |
| Pest resistance | Fully enclosed, rodent-proof steel body |
| Price tier | Premium tier |
- Best-in-class heat retention
- Genuine cold-weather composting
- Rodent-proof steel body
- Compact footprint for its capacity
- Premium-tier price
- Two-person assembly
- Overkill for warm climates

2 FCMP Outdoor IM4000
When a drum will not heat because of compaction and poor airflow rather than cold walls, the IM4000 is the fix. The deep interior fins break up the matted layers that suffocate microbes, the aeration holes are well placed, and the octagonal shape keeps material tumbling instead of sliding. At 37 gallons across two chambers it reaches critical mass easily for a small family, and it is made in Canada from 100 percent post-consumer recycled polypropylene with a galvanized steel frame.
Who it’s for: owners whose drum is full and wet but cold. Who should skip: cold-climate gardeners who need insulation, not just airflow.
| Capacity | 37 gallons, dual chamber |
| Material | 100% post-consumer recycled polypropylene (BPA-free, UV-inhibited) |
| Frame | Galvanized steel |
| Mixing | Deep interior fins, octagonal drum |
| Price tier | Budget-friendly tier |
- Excellent mixing and aeration
- Reaches critical mass at family scale
- Durable construction
- Strong owner ratings
- Uninsulated plastic loses heat in cold weather
- Assembly takes a helper
- No chamber lock

3 VIVOSUN 43-Gallon Dual Chamber
If the plan is to empty the cold, dead drum and start fresh with a proper greens-browns-moisture recipe, the VIVOSUN is the cheapest credible vessel to do it in. The 43-gallon capacity hits critical mass easily, the adjustable vents let you manage the moisture that so often causes stalls, and the black drum absorbs solar heat. It is not insulated and the frame is lighter duty, but for a budget restart it covers the fundamentals.
Who it’s for: anyone starting over on a budget. Who should skip: buyers who want a decade-long frame.
| Capacity | 43 gallons (2 x 21.5 gal), dual chamber |
| Material | PP plastic with galvanized steel frame |
| Vents | Adjustable air vents |
| Drum color | Black (absorbs solar heat) |
| Price tier | Budget tier |
- Big capacity for the money
- Vent control helps manage stalls
- Solar-warming black drum
- Cheapest credible restart
- Uninsulated
- Lighter frame
- Fiddly assembly
The Normal Heat Timeline
One reason beginners panic is that nobody tells them what normal looks like. A tumbler pile does not heat up on day one. Here is the realistic timeline for a well-built pile in warm weather, so you can tell the difference between “slow” and “stuck.”
| Timeframe | What to expect | What it means |
|---|---|---|
| Days 1-3 | Little to no heat | Normal. Microbes are colonizing. Keep feeding and turning. |
| Days 4-7 | Noticeable warmth in the center | Good sign. Mesophilic bacteria are active. Maintain moisture. |
| Days 7-14 | Peak heat, 130-160 F in the core | The thermophilic phase. This is the pile working at full power. |
| Weeks 3-4 | Gradual cooling | Normal. Easy food is consumed. Keep turning; the pile is curing. |
| Weeks 5-8 | Near ambient temperature, earthy smell | Finished or nearly finished compost. |
If your pile never leaves the “days 1-3” stage after two weeks, it is stuck, and the ranked list below is your diagnostic order.
10 Reasons Your Pile Will Not Heat, Ranked by Likelihood
1. Too small. The number one cause. A tumbler chamber under half full cannot retain heat. Fix: fill to at least half before expecting real heat, and add material in batches rather than dribbles.
2. Too dry. Microbes need moisture to function. A dry pile is a dormant pile. Fix: water to the wrung-out-sponge level and check weekly.
3. Not enough nitrogen. A pile of pure leaves or cardboard has nothing to burn. Fix: add fresh greens (kitchen scraps, coffee grounds, fresh grass) until the mix looks balanced.
4. Compacted and airless. Matted layers go anaerobic instead of thermophilic. Fix: break up clumps, add coarse browns, turn every two to three days.
5. Cold weather. Below about 50 F ambient, uninsulated tumblers struggle. Fix: site against a sun-facing wall, keep chambers full, consider an insulating wrap, or accept slower winter performance.
6. Too much of one material. A drum full of grass clippings mats into an airless slab; a drum of pure wood chips has no nitrogen. Fix: diversity. No single material should dominate.
7. Pile is finished. If the material is dark, crumbly, and earthy-smelling, it is done heating because the work is done. Fix: harvest it and start a new batch.
8. Recent disturbance. A full turn or a big addition of cold material temporarily drops core temperature. Fix: wait 48 hours before judging.
9. pH extremes. Very acidic conditions (too many citrus scraps, pine needles) can slow microbes. Fix: add crushed eggshells or a sprinkle of garden lime, and diversify inputs.
10. Contamination. Rare, but pesticide-treated grass clippings can suppress microbial activity. Fix: know your inputs; avoid clippings from lawns treated with herbicides.
The Hot-Pile Recipe
If you want to build a pile that heats fast, follow this layering recipe when filling an empty chamber. Think lasagna: alternate thin layers, moisten as you go, and finish with browns.
- Start with 3-4 inches of coarse browns (wood chips) for drainage and airflow at the bottom.
- Add 2-3 inches of nitrogen-rich greens (kitchen scraps, coffee grounds, fresh grass).
- Cover with 4-6 inches of browns (dry leaves, shredded cardboard).
- Sprinkle water lightly if materials are dry.
- Repeat the greens-browns sandwich until the chamber is half to two-thirds full.
- Finish with a thick brown cap, close the door, and turn five rotations.
- Check temperature in 3-4 days by pushing your hand into the center (carefully) or using a compost thermometer.
The critical details: no layer thicker than about 6 inches, moisture at every stage, and the brown cap on top to insulate and contain odors.
Insulation Tricks for Small or Plastic Tumblers
You cannot change your climate, but you can change your tumbler’s microclimate. These techniques buy real degrees of core temperature.
- Site it against a south-facing wall. Radiant heat and wind shelter together can add 5-10 F of effective warmth.
- Keep chambers full. Thermal mass is insulation. A full drum holds heat overnight; a quarter-full drum does not.
- Wrap the drum on cold nights. An old blanket, moving pad, or purpose-made insulating wrap around the drum slows overnight heat loss. Remove it on warm sunny days.
- Minimize door openings. Every opening dumps core heat. Batch your additions: collect scraps in a kitchen caddy and add every 2-3 days instead of daily.
- Feed consistently. A steady supply of fresh nitrogen keeps the microbial furnace stoked. A starved pile cools down.
Our Verdict
A cold tumbler is a recipe problem, and recipes can be fixed. Work through the seven reasons in order: rebalance toward greens, fix the moisture, build up mass, tumble on rhythm, shred your inputs, and respect winter. A compost thermometer turns the whole process from guesswork into data. And if your drum heats in summer but dies every October, stop fighting physics and get insulation. The Jora JK270 is the standard answer for a reason: it holds the heat that plastic drums give away.
Pingback: Best Compost Tumbler for Cold Climates (2026): Winter Picks